Directions for using FrontPage Express
This is a Microsoft Program that assists you in making a basic webpage without using html. These directions will help you make your own personal homepage with a background color, images, and hyperlinks to other websites. You can print these directions out if you like. (These are geared for our students and teachers at COM-FSM, but I'm sure you can follow them, substituting your own information as necessary.)
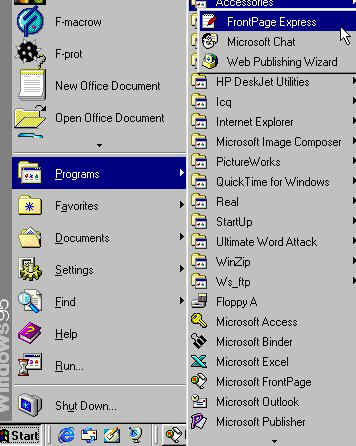
Step 1 On your computer locate the Frontpage Express
Program. Go to Start, Programs, Internet Explorer and
then find FrontPage Express.
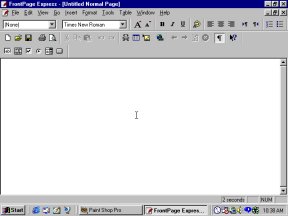
Step 2 Now you should see a screen that is blank just like
this:
Step 3 Save your new document onto your Floppy disk. Go to File,
Save As, and then give your document a title.
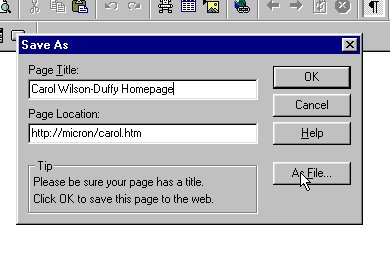
I typed in my name for the title: Carol Wilson-Duffy Homepage. Don't worry about the part
about the page location right now. Click on the button that says "As File"
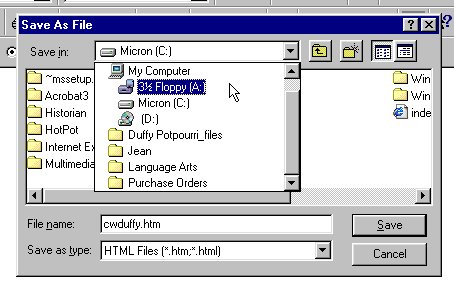
then locate the Floppy A Drive. (Click on Floppy A) Then give your file a name. Use
your first initial and last name. Example: Joe Shmoe = jshmoe.htm
Then click on Save.
Step 4 Before we begin with all the fun stuff, we have to set
up our page so that when people look for our page on the Internet, they can find it
easily. To do this we must use the "Page Properties." So...go to File and
then Page Properties. You will see a screen like the one below.
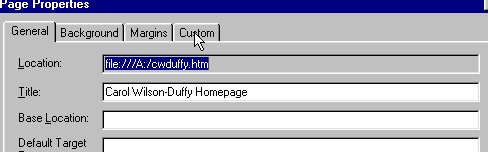
Step 5 Click on the tab that says "Custom".
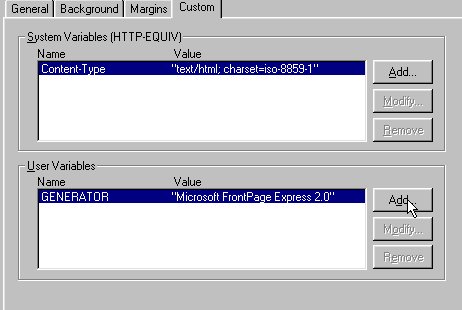
Step 6-Click on the button that says "Add" You
should see this screen:

Step 7 In the box for Name type in: KEYWORDS (all
caps). In the box for Value type in keywords that describe your page. Remember to use
commas between each keywords and also remember to type the words in carefully and use caps
and small case letters correctly. Look at my keywords to get a better idea.
Step 8 Click on OK. Then on the same page, click
on the button that says "ADD". You are going to add a description of your
page.
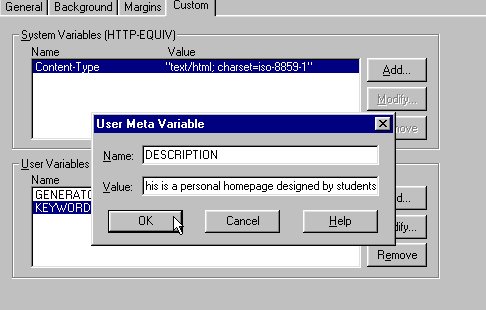
Step 9 In the Name box type in the word DESCRIPTION.
In the Value box type in a complete and grammatically correct sentence that describes your
page. Then click on OK. Click OK one more time and you should be back to
this page:
Step 10- Now it's time for the fun stuff:
Take a minute and look at the tool bars. They are very similar to those in the Microsoft
Word Program. The most different buttons are these ones:
![]()
The first one is for adding advanced tools like "number of visitors" here and
"guest sign in books". I won't go into much detail about that as this is just an
intro. The second one is for inserting a table, the yellow one is for inserting a picture
and the last one that looks the Earth with a "link" is for making a
hyperlink that will connect your page to another person's page.
Step 11 Background: Go up to the Format menu and
click on Background.

Step 12 Choose the color you want. Remember you should try to
use a light background and dark text or a dark background and light text. Also be careful
because you don't want your page so "busy" that people have a hard time reading
it. One last tip...try to keep the text one color and the links another color.
Generally if the text is a different color than black, people think it's a hyperlink and
try to click on it. I chose beige for my background and my text will be black. Links
to other pages will be blue.
Step 13 Start typing. Write down anything you want. For those
in the Poetry Class, write out one of your poems. Decide if you want to have all the text
centered or to the left of the page. If you want the title larger than the rest, highlight
it and then click on the large A in the tool bar. (Hint about single spacing:
click on the Shift and Enter button at the same time to have single spacing.)
Step 14 Time to put in a picture. (This
program is a little limited as to where you can put in an image. Let's do it the easiest
way since it's your first time.Let's put it under your title. So put your mouse underneath
the title of your poem.)Click on the yellow icon that I mentioned earlier. (Or you can go
to the Insert Menu and choose Image.) You should see a screen like this:
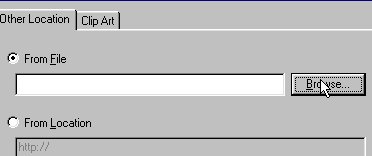
Step 15 Click on the button that says "Browse". The
only pictures or images that you can use on a webpage must be in the ".jpg" or
".gif" format. You need to locate those pictures on your computer. Some people
convert pictures from ".bmp" to ".jpg" or ".gif". Let's try
to find a picture for you.
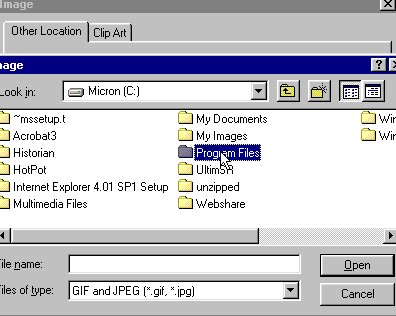
Look at the bottom left of the page above. There is a box that says Files of type:
...click on the arrow the arrow and select "All Files".
Step 16 Click on the arrow in the top box. Select
Micron C. Then click on the Program Files Folder. Click on Microsoft
Office then ClipArt and then Popular. Find the picture
you like. Click on its file name and then click on the "Open" button.
(Hopefully you will find some images. What I like to do is to take a picture with a digital camera or scan in a picture. Then I save it as a "jpg" and use that picture on my website. It seems more personal and it makes me feel more artistic. )
So, you have added a background color, typed in your poem title, formatted it as you
desired, and finally you added a picture. Now you are going to do one last thing. Add a
hyperlink. You are going to add a hyperlink to another website. The name of it is
"Small Island Review" and its web address is: http://www.smallislandreview.com
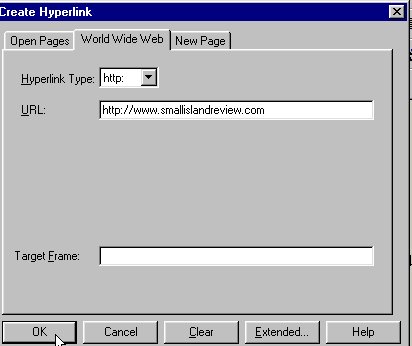
Step 17 Hyperlinks:
At the bottom of your web page type: "For other great student poetry check out
Small Island Review . Then highlight the words: Small Island Review." Click on that
symbol at the top of the tool bar that looks like the Earth and the"link".

Step 18 Now in the box that says "URL" type in
the web address for the Small Island Review. Then click OK.
Step 19 Now your the words "Small Island Review"
should be a different color. When you have the page connected to the web...you can click
on those words and it will take you to the Small Island Review website. (What most
people do before they begin creating their website is they surf the web and try to locate
sites that they want to link to. They write those down and then they have them handy when
they are ready to make their links.)
Well that's it for your introduction to web page making. Good luck!