After a college function I need an efficient way to slog through the photos and find images worth preserving from the event. Over time I have developed a routine that lets me work my way through up to a hundred images in an evening using GIMP as my editor. A couple faculty noted they were also working in GIMP and were unaccustomed to where the tools were that they had in Adobe Photoshop. This page is aimed at this sort of experienced user of editing software who just needs a couple starting points in GIMP.
When I first open an image I usually either crop and auto-balance, or auto-balance and then crop. When working with lots of images, short-cut keys are useful. Shift-c changes the mode to crop mode. Drag upper left to lower right. In the current version the upper left and lower right corners of the crop change the crop size, the upper right and lower left move the whole crop. The next version of GIMP, 2.4, will see a change wherein any corner can resize the crop area.
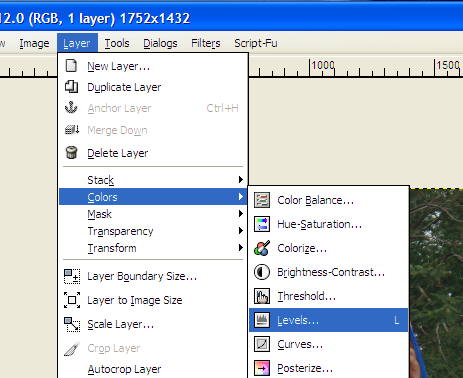
Auto-balance is available from the menu Layer: Colors: Levels.
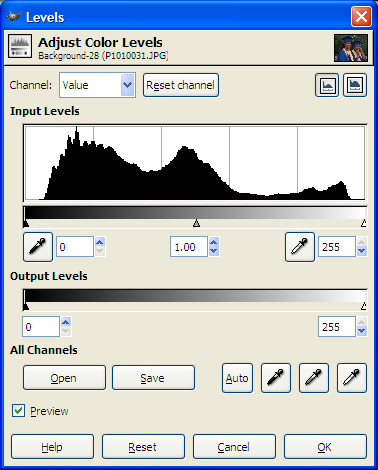
Click on Auto to auto-balance the image.
When auto-balance does not produce the desired results, I usually next turn to adjusting the white point. In GIMP, click on the button circled in red in the image below. Find a white object, or something that is supposed to be white. Click on it. Beware: if the object is not actually white, the whole image will color shift.
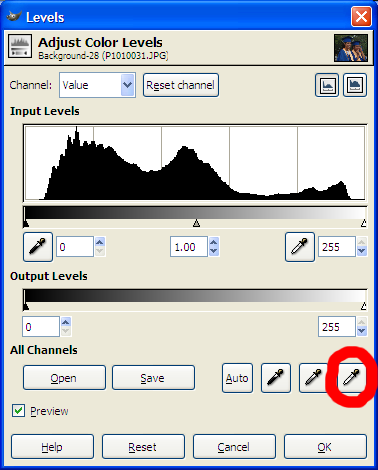
After choosing the white point, find the Levels dialog box and click on OK or the image will revert. Be careful: when working on a small monitor you might have to use the Windows program task bar at the bottom of the screen to find the dialog box. I often find I accidentally click on the Preview hot spot and turn-off the preview mode, so I have developed a habit of calling Levels back up from the programs tool bar at the bottom of the screen.
Only once in thousands of images have I found setting the black point to be useful, and the gray point would require a neutral true gray photo-card be placed in the image. I have never found it all that useful.
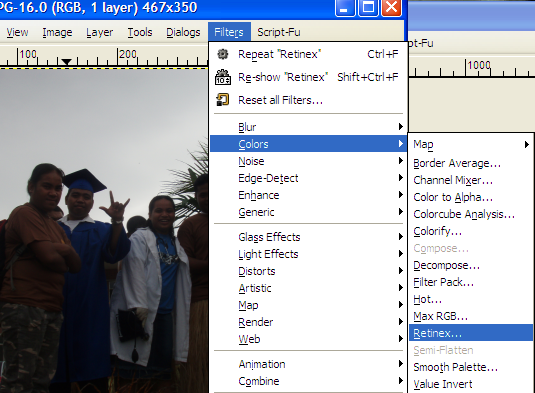
When a picture is backlit, or the subject is dark against a light background, setting a white point on the subject overexposes the background. As a last resort, if the image is worth the effort, I will try the retinex filter. Due to the limited RAM and CPU clock speeds on the machines on which I work, I always scale the image before attempting a retinex. I also find this usually improves the results as well.
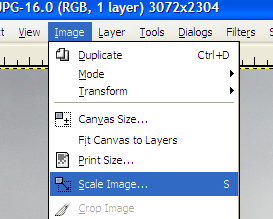
After scaling the image to the desired size, then I attempt a run of the retinex filter.
The filter offers three options, uniform, low, and high. Sometimes all three options simply generate garbage. I tend to have the most success with high followed by uniform, but that may because I use it more often for underexposed subjects than overexposed.

If retinex fails, then I am likely to give up on the image. Should one wish to plug ahead, best bets include Layer: Colors: Curves, and Layer: Colors: Brightness-Contrast. Occasionally shifting the hue is useful. This sub-dialog is non-obvious and non-intuitive. Start at Filters: Colors: Filter Pack... In the Windows section of the dialog box click on the check box for Hue. A new dialog box will appear offering six hue variations. Click on the desired variation. Find the Filter Pack Simulation dialog that launched the sub-dialog and click on OK (use the Windows program bar at the bottom of the screen).
For the power user of GIMP, check out File: Preferences: Interface. Click on the Configure Keyboard shortcuts button and reconfigure the keyboard shortcuts. Since your choices will reassign the chosen keys (in all likelihood), GIMP will caution you. No worries as the old function is not something you were likely using anyway. I reassigned L and S to open Levels and Scale on my computers with a single keypress. I open a new file with Control-o. Then I shift-c to crop. I drag-select the crop and then click on it to crop. Then I press L to Levels, alt-A to run the Auto-balance. You cannot hit enter at this point. Use Control-o for OK and then press enter to leave this dialog box. Then I hit the letter s, press tab twice, choose my vertical size, press alt-s to scale. Control-shift-s does a "save as". I give the file a name with a .jpg extension (in GIMP you set the file type by typing the extension of the desired file type), press enter twice, Control-w to close the file and control-o, down arrow, pop open the next image. I tried to build a macro to do this, but Script-Fu is a full blown programming language, so I just use the keyboard shortcuts to move rapidly through images. Thus a typical sequence is:
Image credits: Background image in retinex shots by Brian Lynch.